Earlier today we had a brief outage in Android Market. For a period of about thirty minutes, some users were unable to find any apps. The problem was detected and corrected, and we believe the user experience is now back to normal. We apologize for the outage.
Monday, June 30, 2014
Things That Cannot Change
[This post is by Dianne Hackborn, whose fingerprints can be found all over the Android Application Framework — Tim Bray]

Sometimes a developer will make a change to an application that has surprising results when installed as an update to a previous version — shortcuts break, widgets disappear, or it can’t even be installed at all. There are certain parts of an application that are immutable once you publish it, and you can avoid surprises by understanding them.
Your package name and certificate
The most obvious and visible of these is the “manifest package name,” the unique name you give to your application in its AndroidManifest.xml. The name uses a Java-language-style naming convention, with Internet domain ownership helping to avoid name collisions. For example, since Google owns the domain “google.com”, the manifest package names of all of our applications should start with “com.google.” It’s important for developers to follow this convention in order to avoid conflicts with other developers.
Once you publish your application under its manifest package name, this is the unique identity of the application forever more. Switching to a different name results in an entirely new application, one that can’t be installed as an update to the existing application.
Just as important as the manifest package name is the certificate that application is signed with. The signing certificate represents the author of the application. If you change the certificate an application is signed with, it is now a different application because it comes from a different author. This different application can’t be uploaded to Market as an update to the original application, nor can it be installed onto a device as an update.
The exact behavior the user sees when installing an application that has changed in one of these two ways is different:
If the manifest package name has changed, the new application will be installed alongside the old application, so they both co-exist on the user’s device at the same time.
If the signing certificate changes, trying to install the new application on to the device will fail until the old version is uninstalled.
If you change the signing certificate of your application, you should always change its manifest package name as well to avoid failures when it’s installed. In other words, the application coming from a different author makes it a different application, and its package name should be changed appropriately to reflect that. (Of course it’s fine to use the same package name for the development builds of your app signed with your test keys, because these are not published.)
Your AndroidManifest.xml is a public API
More than just your package name that is immutable. A major function of the AndroidManifest.xml is essentially to declare a public API from your application for use by other applications and the Android system. Every component you declare in the manifest that is not private (that is whose android:exported state is true) should be treated as a public API and never changed in a way that breaks compatibility.
A subtle but important aspect of what constitutes a break in compatibility is the android:name attribute of your activity, service, and receiver components. This can be surprising because we think of android:name as pointing to the private code implementing our application, but it is also (in combination with the manifest package name) the official unique public name for that component, as represented by the ComponentName class.
Changing the component name inside of an application can have negative consequences for your users. Some examples are:
If the name of a main activity of your application is changed, any shortcuts the user made to it will no longer work. A shortcut is an Intent that directly specifies the ComponentName it should run.
If the name of a service implementing a Live Wallpaper changes, then a user who has enabled your Live Wallpaper will have their wallpaper revert to the system default when getting the new version of your app. The same is true for Input Methods, Accessibility Services, Honeycomb’s new advanced Widgets, and so on.
If the name of a receiver implementing a Device Admin changes, then as with the live wallpaper example, the device admin will be disabled when the application is updated. This also applies to other kinds of receivers, such as App Widgets.
These behaviors are an outcome of how the Intent system is used on Android. There are two main kinds of Intents:
Implicit Intents only specify “what” they should match, using actions, categories, data, MIME types, and so on. The exact components that they will find are only determined at run-time, by the Package Manager matching it against the current applications.
Explicit Intents specify a single explicit “who” they should match, through a ComponentName. Regardless of whatever else is in the Intent, it is only associated with the exact manifest package name and class name as given in its ComponentName.
Both of these types of Intents are important to how Android interacts with your application. A typical example of this is how users browse and select live wallpapers.
To let the user pick a live wallpaper, the first thing Android must do is show them a list of the available live wallpaper services. It does this by building an implicit Intent with the appropriate action for a live wallpaper and asking the Package Manager for all services that support this Intent. The result is then the list of live wallpapers shown to the user.
When the user actually selects a specific live wallpaper they want to use, however, Android now must build an explicit Intent that identifies that particular live wallpaper. This is what is handed to the WallpaperManager to tell it which wallpaper to show.
This is why changing the name of the component in your manifest will cause the wallpaper to disappear: the explicit Intent that was previously saved is now invalid because the ComponentName it references no longer exists. There is no information available to indicate what the new name of the component is. (For example consider if your application had two different live wallpaper services the user could select.) Instead, Android must treat that live wallpaper as uninstalled and revert to its default wallpaper.
This is how input methods, device administrators, account managers, app widgets, and even application shortcuts work. The ComponentName is the public unique name of the components you declare in your manifest, and must not change if they are visible to other applications.
In conclusion: There are some parts of your application that can not change. Please be careful.
Behind the apps Amazon and imeem
Last week we introduced a couple Android developers who shared how they built their Android apps and gave their insight into Android app development. This week, we have videos of two developers whove built music-related apps.
The first is of Allan Hsu—he wrote imeems Android app. A couple of things he mentions in his videos:
- Using SQLite databases and regular expressions
- Completing the app, including rewriting many of their Activities and web service API calls, in just 6 weeks.
The second video features Casey Langen—he wrote the Amazon MP3 for Android app. Things he mentions in the videos include:
- Using Apache HTTPClient to download data from their servers. Also used ListView in all activities and the MediaPlayer for song previews.
- Developers new to Android should get familiar with ViewGroups and how theyre implemented.
Check out other Android developer videos here: Android App Developers.
Sunday, June 29, 2014
Twitter for Android A closer look at Android’s evolving UI patterns
[This post is by Chris Nesladek, Interaction Designer, Richard Fulcher, Interaction Designer, and Virgil Dobjanschi, Software Engineer — Tim Bray]
Along with our regular updates of the Android platform, we like to build example applications that showcase best practices for UI features and behavior patterns, to help our 3rd party developers create even richer applications.
For example, the Twitter for Android application that we worked with Twitter to design gives you, the 3rd party developer, a working example of how you can customize and build an application that’s both fun and highly functional. This blog post is meant to showcase these patterns along with some recommended implementations as you start to develop your applications around them.
Let’s get started and explore these patterns in more detail now.
Pattern 1: Contacts Sync with Address book at Sign in
 One of the most important intents we added to Twitter for Android was the ability to sync your Twitter contacts into the phone. This integration also allowed us to give Twitter users with an Android phone the use of the QuickContact widget, which gives users a choice of ways to contact their followers.
We recommend:
- Using this activity upon first signing into an application.
- If your app has no sign-in, showing this screen at first launch to improve discoverability of contact sync.
Pattern 2: Twitter account integration with QuickContact for Android

The good news for developers is you get this highly functional contacts feature for free if users choose to sync contact information into your app. QuickContact for Android provides instant access to a contacts information and communication modes. For example, a user can tap a contact photo and with one more tap launch a call, SMS, or email to that person. Other applications such as Email, Messaging, and Calendar can also reveal the QuickContact widget when you touch a contact photo or status icon.
Pattern 3: Dashboard

The dashboard pattern serves as a home orientation activity for your users. It is meant to include the categories or features of your application. We recommend including an Action bar on this screen as well.
The dashboard can be static or dynamic. For example, in the case of our dashboard for Twitter, we used the goodness of Live Wallpapers introduced in 2.1 to create an animated dashboard complete with real-time trend bubbles and the Twitter bird silhouette.
We recommend:
- Using this pattern to showcase the most prominent features of your app.
- Adding some unexpected delight to this screen, making it engaging without overwhelming the user.
- Exercising caution - for some apps, the user will want to jump directly into the meat of the application. For others, this sort of welcoming dashboard will be the right starting place.
Pattern 4: Action Bar

The Action bar gives your users onscreen access to the most frequently used actions in your application. We recommend you use this pattern if you want to dedicate screen real estate for common actions. Using this pattern replaces the title bar. It works with the Dashboard, as the upper left portion of the Action bar is where we recommend you place a quick link back to the dashboard or other app home screen.
We recommend:
- Placing an Action bar at the top of the screen to house the most common actions for your application that work across all activities.
- Using no more than 3 onscreen actions for the Action bar. Use the main menu as overflow for actions that are less important. The balance between Action bar and main menu will ensure the richness of interaction that is Android.
- Making the left-hand region actionable, offering one-touch return to your dashboard or other app home.
Pattern 5: Search Bar

The Search bar pattern gives you a fast way to switch between resources that are searchable by your application. For example, with Twitter for Android, we used the pattern to support searching within Tweets as well as People. When triggered, this pattern sits on top of the Action bar.
We recommend:
- You support suggestions.
- You keep a search history so users upon returning to the search activity can have quick one-button access to previous searches.
Additionally, you can feel free to use the Search bar selection mechanism as a replacement for tabs since it’s really just a fast pivot on a data set. If you have more than 3 data sets, tabs become problematic since no more than 3 can be onscreen at once. For example, look at how we implemented the Profile switching mechanism below:

Pattern 6: QuickActions

QuickActions is our newest UI pattern. Currently, it has been implemented as a fast, engaging, popup triggered by an onscreen UI element that identifies it in as minimally disruptive way as possible. We recommend you use this pattern for list views that are data intensive where items inside the list have contextual actions associated with them. QuickActions can be used as a replacement for our traditional dialog invoked by long press.
By choosing to use this pattern as part of a list, we made it easier for Twitter users to take action on the information in the list view by keeping the item and associated actions in context. We also took the extra step of making it easier to target links in list views by turning off the list view button element as a secondary component to making this pattern even more usable. This way users of Twitter for Android can view links with one tap and/or see the posted tweet on a map by tapping the tweet meta data directly.
We recommend:
- Creating a UI element that is minimal and recognizable as an action popup; either a frame around an image or an icon in a list item.
- Only using this pattern in applications where the data is intensive.
- Placing the action popup below or above the information you wish to allow users to take relevant contextual actions on. This will make it easier to associate the actions with the content in view.
- Turning off the entire list view button element so that regions can be easily targeted for the user.
Pattern 7: Companion Widget

The companion widget pattern is something we recommend all developers think about deeply. The widget you create should be more than a big button link into your app. Used correctly, it can provide a place on a home screen that personalizes, albeit in a small window, your application.
In the case of Twitter for Android, we designed and built small and large-sized widgets to support different types of functionality. Both widgets let a user view his/her tweetstream. However, the smaller widget hands off to the application to create a reply to a tweet from the stream, whereas the larger one gives direct access to the Tweet compose activity.
We recommend:
- Identify your application in the widget with a brand icon
- Make this more than a button into your app. Give your user an action or view into the app itself.
- Keep the activity stateful so that on exiting the application and re-entering a user is returned to the same context in the activity, minimizing the impact of using the dashboard if it is used.
Don’t think we quite got something right? As many of you know, we’ll soon be open sourcing this application code under the Android Open Source Project. We look forward to seeing what you can build starting from this code these UI patterns. In the meantime, Happy Tweeting!
Twitter for Android is available in Android Market for immediate download. It is compatible with Android 2.1/2.0 devices, with support coming soon for more.
Come check out the Android UI patterns session at Google I/O next week to learn more about how this applies across our framework and not just in the Twitter app.
Euro Android Developer Labs
This series started last month, and now registration is open for the European leg:
Berlin — September 28 and 29.
London — October 3 and 5.
Paris — October 27 and 28.
Remember, this ADL series isn’t another set of introduction-to-Android sessions, nor any other kind of general overview. Its specifically aimed at optimizing Android apps for tablets, in particular creating high-quality tablet apps with an emphasis on polish and user-experience.
Registration is a two-step process. Anyone can register, but we can only accommodate a relatively small number of attendees from among the registrants, based on whether they already have an Android app with the potential to be a top-tier tablet app in terms of quality, fit, and finish. The goal is to bring your app to the ADL, and leave equipped to make it into one that makes Android tablet users smile.
Google Play App Translation Service
Posted by Ellie Powers, Google Play team
Today we are happy to announce that the App Translation Service, previewed in May at Google I/O, is now available to all developers. Every day, more than 1.5 million new Android phones and tablets around the world are turned on for the first time. Each newly activated Android device is an opportunity for you as a developer to gain a new user, but frequently, that user speaks a different language from you.
To help developers reach users in other languages, we launched the App Translation Service, which allows developers to purchase professional app translations through the Google Play Developer Console. This is part of a toolbox of localization features you can (and should!) take advantage of as you distribute your app around the world through Google Play.
We were happy to see that many developers expressed interest in the App Translation Service pilot program, and it has been well received by those who have participated so far, with many repeat customers.
Here are several examples from developers who participated in the App Translation Service pilot program: the developers of Zombie Ragdoll used this tool to launch their new game simultaneously in 20 languages in August 2013. When they combined app translation with local marketing campaigns, they found that 80% of their installs came from non-English-language users. Dating app SayHi Chat expanded into 13 additional languages using the App Translation Service. They saw 120% install growth in localized markets and improved user reviews of the professionally translated UI. The developer of card game G4A Indian Rummy found that the App Translation Service was easier to use than their previous translation methods, and saw a 300% increase with user engagement in localized apps. You can read more about these developers’ experiences with the App Translation Service in Developer Stories: Localization in Google Play.
To use the App Translation Service, you’ll want to first read the localization checklist. You’ll need to get your APK ready for translation, and select the languages to target for translation. If you’re unsure about which languages to select, Google Play can help you identify opportunities. First, review the Statistics section in the Developer Console to see where your app has users already. Does your app have a lot of installs in a certain country where you haven’t localized to their language? Are apps like yours popular in a country where your app isn’t available yet? Next, go to the Optimization Tips section in the Developer Console to make sure your APK, store listing, and graphics are consistently translated.

You’ll find the App Translation Service in the Developer Console at the bottom of the APK section — you can start a new translation or manage an existing translation here. You’ll be able to upload your app’s file of string resources, select the languages you want to translate into, select a professional translation vendor, and place your order. Pro tip: you can put your store listing text into the file you upload to the App Translation Service. You’ll be able to communicate with your translator to be sure you get a great result, and download your translated string files. After you do some localization testing, you’ll be ready to publish your newly translated app update on Google Play — with localized store listing text and graphics. Be sure to check back to see the results on your user base, and track the results of marketing campaigns in your new languages using Google Analytics integration.
Good luck! Bonne chance ! ご幸運を祈ります! 행운을 빌어요 ¡Buena suerte! Удачи! Boa Sorte!
Saturday, June 28, 2014
Thinking Like a Web Designer

[This post is by Roman Nurik, who is passionate about icons, with input from me and a bunch of the Framework engineers. —Tim Bray]
The number of people working on mobile apps, and specifically Android, is growing fast. Since modern mobile software-development is a relatively new profession, the community is growing by sucking in experts from related domains, one being web design and development.
It turns out that familiarity with web UI development, particularly using modern HTML5 techniques, can be a great primer for Android UI development. The Android framework and SDK have many analogues to tools and techniques in the Web repertoire of HTML, CSS, and JavaScript.
In this blog post, we’ll walk through a few web development features and look for matches in the world of Android UI development.
Device resolutions and physical sizes
One of the most important aspects of both Android UI design and web design is support for multiple screen resolutions and physical sizes. Just as your web app needs to work on any physical display and inside any size browser window, your native app needs to run on a variety of form factors, ranging from 2.5” phones to 10” tablets to (possibly) 50” TVs.
Let’s look at some ways in which CSS and Android allow for flexible and adaptive layouts.
Providing custom layouts for different resolutions
CSS3 media queries allow developers to include additional stylesheets to target different viewport and screen configurations. For example, developers can provide additional style rules or override existing styles for mobile devices. Although the markup (layout hierarchy) remains the same, CSS3 has several sophisticated techniques for completely transforming the placement of elements with different stylesheets.
Android has long offered a similar mechanism in resource directory qualifiers. This extends to many different types of resources (layouts, images or ‘drawables’, styles, dimensions, etc). Thus you can customize the view hierarchy as well as styling depending on device form factor, A base set of layouts for handsets can be extended for tablets by placing additional layouts in res/layout-xlarge or res/layout-sw600dp (smallest width 600 density-independent pixels) directories. Note that the latter syntax requires Android 3.2 or later.
Below is a CSS3 example of how one could hide a ‘left pane’ on smaller devices and show it on screens at least 600 pixels wide:
#leftPane {
  display: none;
}

@media screen and (min-device-width:600px) {
  #leftPane {
    display: block;
  }
}
The same could be accomplished on Android using multiple layout directories:
res/layout/foo.xml:
<FrameLayout>
  <!-- a single pane -->
  <View android:id="main_pane">
</FrameLayout>res/layout-sw600dp/foo.xml:
<LinearLayout android:orientation="horizontal">
  <!-- two panes -->
  <View android:id="left_pane">
  <View android:id="main_pane">
</LinearLayout>
As a side note, if you plan on creating multi-pane layouts, consider using fragments, which help break up your screens into modular chunks of both layout and code.
There are also other neat ways of using resource directory qualifiers. For example, you could create values/dimens.xml and values-sw600dp/dimens.xml files specifying different font sizes for body text, and reference those values in your layouts by setting android:textSize="@dimen/my_body_text_size". The same could be done for margins, line spacing, or other dimensions to help manage whitespace on larger devices.
‘Holy grail’ layouts
Web developers have long dreamt of an easy way to build a ‘holy grail’ 5-pane layout (header/footer + 3 vertical columns). There are a variety of pre-CSS3 tricks including position:fixed, float:left, negative margins, and so on, to build such layouts but CSS3 introduced the flexible box module, which simplifies this tremendously.

Figure: An archetypal “holy grail” layout
It turns out that grail is pretty holy for Android tablet apps, too, and in particular for tablets held sideways in landscape mode. A good approach involves the use of LinearLayout, one of the simplest and most popular of the Android layouts.
LinearLayout has this neat way to stretch its children to fit the remaining space, or to distribute available space to certain children, using the android:layout_weight attribute. If a LinearLayout has two children with a fixed size, and another child with a nonzero layout_weight, that other child view will stretch to fill the remaining available space. For more on layout_weight and other ways to make layouts more efficient (like switching from nested LinearLayouts to RelativeLayout), check out Layout Tricks: Creating Efficient Layouts.
Let’s take a look at some example code for implementing such a ‘holy grail’ layout on Android and on the web:
<LinearLayout xmlns:android="http://schemas.android.com/apk/res/android"
    android:id="@+id/container"
    android:layout_width="match_parent"
    android:layout_height="match_parent"
    android:orientation="vertical">

    <!-- top pane -->
    <View android:id="@+id/top_pane"
        android:layout_width="match_parent"
        android:layout_height="50dp" />

    <LinearLayout android:id="@+id/middle_container"
        android:layout_width="match_parent"
        android:layout_height="0dp"
        android:layout_weight="1"
        android:orientation="horizontal">

        <!-- left pane -->
        <View id="@+id/left_pane"
            android:layout_width="300dp"
            android:layout_height="match_parent" />

        <!-- center pane -->
        <View id="@+id/center_pane"
            android:layout_width="0dp"
            android:layout_height="match_parent"
            android:layout_weight="1" />

        <!-- right pane -->
        <View id="@+id/right_pane"
            android:layout_width="300dp"
            android:layout_height="match_parent" />

    </LinearLayout>

    <!-- bottom pane -->
    <View android:id="@+id/bottom_pane"
        android:layout_width="match_parent"
        android:layout_height="50dp" />

</LinearLayout>
Note: Android tablet apps in landscape will generally show an action bar as the top pane and will usually have neither a right nor bottom pane. Also note that the action bar layout is automatically provided by the framework as of Android 3.0, and thus you don’t need to worry about positioning it.
And here’s an example implementation using the CSS3 flexible box model; notice the similarities:
<style>
  html, body { margin: 0; height: 100%; }

  #container {
    height: 100%;
    display: -webkit-box; /* like LinearLayout */
    display:    -moz-box;
    -webkit-box-orient: vertical; /* like android:orientation */
       -moz-box-orient: vertical;
  }

  #top, #bottom { height: 50px; }

  #middle {
    -webkit-box-flex: 1; /* like android:layout_weight */
       -moz-box-flex: 1;
    display: -webkit-box;
    -webkit-box-orient: horizontal;
       -moz-box-orient: horizontal;
  }

  #left, #right { width: 300px; }

  #center {
    -webkit-box-flex: 1;
       -moz-box-flex: 1;
  }
</style>

<div id="container">
  <div id="top"></div>
  <div id="middle">
    <div id="left"></div>
    <div id="center"></div>
    <div id="right"></div>
  </div>
  <div id="bottom"></div>
</div>
Layered content
In CSS, with position:absolute, you can overlay your UI elements. On Android, you can use FrameLayout to achieve this. The child views in a frame layout are laid out on top of each other, with optional layout_gravity attributes indicating alignment with the parent frame layout.
Below is a contrived example of a FrameLayout with three children.

Figure: Example FrameLayout with three children (2 with top-left and 1 bottom-right alignment)

Figure: Isometric view of the example FrameLayout and its children.
The code for this example is as follows:
<FrameLayout xmlns:android="http://schemas.android.com/apk/res/android"
    android:layout_width="300dp"
    android:layout_height="200dp">

    <!-- bottom-most child, with bottom-right alignment -->
    <View android:layout_gravity="bottom|right"
        android:layout_width="100dp"
        android:layout_height="150dp" />

    <!-- middle child, with top-left alignment -->
    <View android:layout_gravity="top|left"
        android:layout_width="200dp"
        android:layout_height="175dp" />

    <!-- top-most child, with top-left alignment →
    <!-- also stretched to fill vertically -->
    <View android:layout_gravity="top|left"
        android:layout_width="100dp"
        android:layout_height="match_parent" />

</FrameLayout>
Scrollable content
HTML, by default, flows in reading order and scrolls vertically. When content extends beyond the bottom of the browser, scrollbars automatically appear. Content panes can also be made individually scrollable using overflow:scroll or overflow:auto.
Android screen content isn’t scrollable by default. However, many content Views such as ListView and EditText offer scrolling, and any layout can be made scrollable by wrapping it in a ScrollView or HorizontalScrollView.
It’s also possible to add custom scrolling to views by using methods like View.scrollTo and helpers like Scroller in response to touch events. And for horizontal, snap-to-page-bounds scrolling, one can use the excellent new ViewPager class in the support library.
Below is an example of a ScrollView containing a single TextView child and the code needed to implement something like this.

Figure: A TextView inside a ScrollView, scrolled about half way.
<ScrollView xmlns:android="http://schemas.android.com/apk/res/android"
    android:layout_width="match_parent"
    android:layout_height="match_parent">

    <!-- the scrollable content -->
    <TextView android:layout_gravity="bottom|right"
        android:layout_width="match_parent"
        android:layout_height="wrap_content"
        android:padding="32dp"
        android:textSize="48sp"
        android:text="The
quick
brown
fox
jumps
over..." />

</ScrollView>
Custom layouts
Sometimes the positioning and layout behaviors you can achieve with CSS aren’t enough to achieve your desired layout. In those cases, developers fall back on JavaScript coupled with absolute positioning to place and size elements as needed.
Programmatically defined layouts are also possible on Android. In fact, they’re sometimes the most elegant and/or performant way of implementing a unique or otherwise tricky layout. Not happy with nesting LinearLayouts for implementing a 2x3 grid of navigation icons? Just extend ViewGroup and implement your own layout logic! (see an example DashboardLayout here). All the built-in layouts such as LinearLayout, FrameLayout, and RelativeLayout are implemented this way, so there generally aren’t the same performance implications with custom layouts as there are with scripted layout on the web.
Device densities
Web designers have long dealt with the reality that display densities vary, and that there wasn’t much they could do about it. This meant that for a long time web page graphics and UI elements had different physical sizes across different displays. Your 100px wide logo could be 1” wide on a desktop monitor or ¾” on a netbook. This was mostly OK, given that (a) pointing devices such as mice offered generally good precision in interacting with such elements and (b) browsers allowed visually-impaired users to zoom pages arbitrarily.
However, on touch-enabled mobile devices, designers really need to begin thinking about physical screen size, rather than resolution in pixels. A 100px wide button on a 120dpi (low density) device is ~0.9” wide while on a 320dpi (extra-high density) screen it’s only ~0.3” wide. You need to avoid the fat-finger problem, where a crowded space of small touch targets coupled with an imprecise pointing tool (your finger) leads to accidental touches. The Android framework tries really hard to take your layout and scale elements up or down as necessary to work around device-density differences and get a usable result on a wide range of them. This includes the browser, which scales a 160px <img> at 100% browser zoom up to 240px on a 240dpi screen, such that its physical width is always 1”.
Developers can achieve finer-grained control over this browser scaling by providing custom stylesheets and images for different densities, using CSS3 media query filters such as -webkit-max-device-pixel-ratio and <meta> viewport arguments such as target-densitydpi=device-dpi. For an in-depth discussion on how to tame this mobile browser behavior see this blog post: Pixel-perfect Android web UIs.
For native Android apps, developers can use resource directory qualifiers to provide different images per density (such as drawable-hdpi and drawable-mdpi). In addition, Android offers a special dimension unit called ‘density independent pixels’ (dp) which can (and should!) be used in layout definitions to offset the density factors and create UI elements that have consistent physical sizes across screens with different densities.
Features you don’t have out of the box
There are a few features that web designers and developers rely on that aren’t currently available in the Android UI toolkit.
Developers can defer to user-driven browser zooming and two-dimensional panning for content that is too small or too large for its viewport, respectively. Android doesn’t currently provide an out-of-the-box mechanism for two-dimensional layout zooming and panning, but with some extra legwork using existing APIs, these interactions are possible. However, zooming and panning an entire UI is not a good experience on mobile, and is generally more appropriate for individual content views such as lists, photos, and maps.
Additionally, vector graphics (generally implemented with SVG) are gaining in popularity on the Web for a number of reasons: the need for resolution independence, accessibility and ‘indexability’ for text-heavy graphics, tooling for programmatic graphic generation, etc. Although you can’t currently drop an SVG into an Android app and have the framework render it for you, Android’s version of WebKit supports SVG as of Android 3.0. As an alternative, you can use the very robust Canvas drawing methods, similar to HTML5’s canvas APIs, to render vector graphics. There are also community projects such as svg-android that support rendering a subset of the SVG spec.
Conclusion
Web developers have a number of different tools for frontend layout and styling at their disposal, and there are analogues for almost all of these in the world of Android UI engineering. If you’re wondering about analogues to other web- or CSS-isms, start a conversation out there in the Android community; you’ll find you’re not alone.
Android SDK m5 rc14 now available
On behalf of the entire Android team, Im happy to let you know that an updated version of the Android SDK – were calling it m5-rc14 – is now available. Today, were continuing the early look at the Android SDK that we started back in November by providing updates to the Android APIs and the developer tools based, in part, on the great feedback and suggestions developers have been giving us. Were excited about the progress that weve made and look forward to making additional updates in the future as the platform evolves towards production-readiness.
There are a couple of changes in m5-rc14 Id like to highlight:
- New user interface - As I mentioned when we introduced the m3 version of the Android SDK, were continuing to refine the UI thats available for Android. m5-rc14 replaces the previous placeholder with a new UI, but as before, work on it is still in-progress.
- Layout animations - Developers can now create layout animations for their applications using the capabilities introduced in the android.view.animation package. Check out the LayoutAnimation*.java files in the APIDemos sample code for examples of how this works.
- Geo-coding - android.location.Geocoder enables developers to forward and reverse geo-code (i.e. translate an address into a coordinate and vice-versa), and also search for businesses.
- New media codecs - The MediaPlayer class has added support for the OGG Vorbis, MIDI, XMF, iMelody, RTTL/RTX, and OTA audio file formats.
- Updated Eclipse plug-in - A new version of ADT is available and provides improvements to the Android developer experience. In particular, check out the new Android Manifest editor.
You can find more information about whats changed in a couple of documents that weve published. First is an overview of the changes to the Android APIs in API Changes Overview. If you want a more granular view of whats changed, an API diff between m3-rc37 and m5-rc14 is also available. Finally, Upgrading the SDK provides links to the two previously referenced documents and the release notes, as well as instructions on how to upgrade your development environment.
We still need your help in shaping the platform, so if you find issues with the Android APIs or the developer tools, please let us know through the Android Issue Tracker. If you have general comments or questions, please head on over to the Android groups to get in touch.
Were looking forward to all the applications that developers will create using this new version of the Android SDK. Of course, you can use m5-rc14 or any older version of the SDK for your Android Developers Challenge submission.
Android at the Game Developers Conference
Tuesday, March 9 marks the start of the 2010 Game Developers Conference in San Francisco, and Android will be there! There has been a lot of interest about Android from the game development community, and our presence at GDC is intended to provide developers everything they need to get started with the platform. We are hosting several technical sessions and participating in two industry panels.
We also want to meet you and answer your questions about Android game development, so weve set aside time for "office hours." Android team engineers will be on-hand to answer your questions, and if you have a game in development for Android, wed love to see a demo.
Below, you can see the technical sessions that were hosting and industry panels that were participating in. We look forward to seeing you at GDC2010!
Technical sessions
Tuesday, March 9
Bootstrapping Games on Android
Chris Pruett
Everything you need to know about games on Android in 60 minutes.
1:45 PM - 2:45 PM
Room 309, South Hall
Wednesday, March 10
Bring Your Games to Android
Jack Palevich
An in-depth look at writing and porting C++ games using the NDK and a thin Java shell.
10:30 AM - 11:30 AM
Room 302, South Hall
Get the Most out of Android Media APIs
Dave Sparks & Jason Sams
Tips and tricks for optimizing your sound, video, and graphics for compatibility, efficiency, and battery life.
11:45 AM - 12:45 PM
Room 302, South Hall
Android Office Hours
The Android team
Come meet the team, ask us your questions, and show off your games!
3:00 PM - 4:00 PM
Room 302, South Hall
Industry panels
Wednesday, March 10
GamesBeat2010: A sea of mobile devices
Eric Chu
Industry experts weigh in on the future of mobile game development.
4:30 PM - 5:30 PM
Moscone Convention Center
Thursday, March 11
After the iPhone...what?
Dave Sparks
Audio experts discuss the nitty gritty technical details of alternative gaming platforms.
10:30 AM - 11:30 AM
Room 112, North Hall
Friday, June 27, 2014
New Look New Purchase Flow in Google Play
Posted by Purnima Kochikar, Director of Business Development, Games & Applications
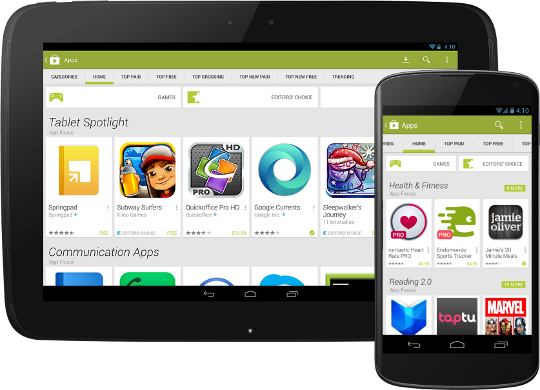

Today we announced that a new version of the Google Play Store app is rolling out worldwide to Android phones and tablets. This new app brings a redesigned UI that’s easier to use and showcases more great content for users. For developers, the new app offers more ways for your app to get noticed, as well as a new, simpler purchase flow.

The new UI is simple and easier to browse. Collections are front and center on the homepage, helping users discover great content through recommendations and curated lists. Items in collections are now presented as cards, with a larger area for your app’s graphics and a larger touch target for users. Overall, the homepage surfaces more apps than before and highlights them more effectively right on the page.

Most important for apps that sell in-app products, the new UI offers a dramatically simplified, dialog-based purchase flow that lets users buy your products without leaving the context of the app. Your app remains active and visible behind the purchase dialogs. When the purchase is complete, users return directly to the place they left, without your app having to reconstruct its state. It’s especially powerful when combined with In-app Billing v3, providing a faster and more reliable purchase flow.
All of these changes build on the core features of Google Play. Our editorial team will continue to look for exemplary apps to showcase in Editors’ Choice and other collections, and our familiar top lists will continue to track the market performance of your app on an ongoing basis.
Watch for the new Play Store app (version 4.0.25) coming to your devices soon. The rollout has already started and we expect all devices running Android 2.2 or higher to have received the update over the next few weeks.
More Blogginess
Hello everyone, and welcome to a rare (in this space) blog about blogging. My name is Tim Bray, and I’m the new editor of this Android Developers’ Blog. I am only a student of Android, but I’m a veteran blogger, I’m part of the Android team, and they’ve given me a pretty free hand to find and publish the interesting stories. I’m expecting to enjoy this and hope you will too.
The work on Android is done at various places around the world, but in Mountain View, California there’s a building on the Google campus with an Android statue in front of it, positioned among dessert-themed sculptures that illustrate the major platform releases to date.

As of now, this blog has a header image taken from where some of the Android work happens, behind the statuary looking out. There are a ton of places on the Internet where you can read people’s opinions about what’s happening next with Android, and a lot of them are good. The one you’re reading now is the one that’s written from the inside looking out.
History
This space has been used mostly in a just-the-facts press-release-flavored way and, while that’s been useful, I thought it could be livelier. Because, even after only a few weeks’ exposure to what’s going on here, I’ve discovered that there are a ton of interesting Android stories, and while some of them probably have to be secrets, there are more than enough we can tell to crank up the interest level here.
I offered this opinion internally, loudly and repeatedly, and Android management surprised me by coming back with “OK, it’s your problem now.”
Future
I’m not going to write everything here; I’m going to track down the people who actually do the creative Android-building work and get them to tell their own stories. I will bend over backward to make sure the articles have the voices of the people who write them.
We will go on being a source for hard opinion-free just-the-facts Android news. But I’d like to surround each burst of that with a cluster of reportage about what it means and how we think it will affect the Android communities.
The immediate future is going to be pretty intense, because we’re only a few weeks away from Google I/O, and I don’t think that I’m telling any secrets when I say that there will be Android-related announcements at that event. So the problems that come with the new job probably won’t include scaring up content.
The first new-flavor post is going to be on a currently-hot subject, multitasking and background processing, written by an engineer at the center of the Android universe.
Wish me luck, and stay tuned!
Update on Tablet App Guidelines and Screenshots
Posted by Ellie Powers, Google Play team
More and more, developers are investing in a full tablet experience for their apps and seeing those investments pay off big. Starting today, it’s even easier to show off those tablet apps to users and to understand what it takes to make a great tablet app.
Many of you have already made optimizations to your apps to make them more beautiful and useful on tablets, and we’re giving you a way to showcase your application’s specialized tablet layouts. You’re now able to upload screenshots of your app running on 7” and 10” tablets to the Google Play Developer Console, and those screenshots are shown preferentially in Google Play to users on those devices.
In October, we published the tablet app quality checklist, which shares best practices for creating tablet applications that users will love. Weve updated this checklist with additional tips and guidelines, as well as more details on specific technical checks you should perform to ensure your app is correctly optimized for tablets. Soon, we’ll start surfacing tips based on our tablet app quality guidelines directly in the Google Play Developer Console, and we’ll use these guidelines to help users better discover tablet apps in Google Play.
So upload your tablet screenshots and confirm your app follows the quality guidelines today.
Thursday, June 26, 2014
Android Market update priced applications for US users

Last Friday, we enabled developers to upload priced apps and saw a flurry of activity in the days that followed. Today, it is my pleasure to let you know that we have begun the phased rollout of priced applications to T-Mobile G1 users in the US. Once the service is enabled on their devices, T-Mobile G1 users will be able to see the priced apps immediately without the need to reboot. For more details on this update to Android Market, please see last weeks blogpost.
Android at Google I O 2013
Posted by Reto Meier, Android Developer Relations Tech Lead

Google I/O 2013 is less than a week away, and the full session schedule - featuring 34 Android sessions (and 3 codelabs) - is now available. We have great Android content spread across three packed days - covering everything from design, development, and distribution.
Not everyone can come to San Francisco to join us in person, so we’ll be streaming a selection of the best content as part of Google Developers Live. In addition to the keynote and four session streams (including one dedicated to Android), you’ll see one-on-one product deep dives, executive interviews, and Sandbox walkthroughs broadcast from the GDL stage at I/O. All the live feeds will be available on the Google I/O homepage from the comfort of your own home - or join our Google Developer Groups to experience Google I/O as part of Google I/O Extended.
Whether you’re attending in person or virtually, you can follow all the action using the official Google I/O 2013 conference companion app! It supports devices running Android 2.3+, and is optimized for phones and tablets of all shapes and sizes.

Use it to view the conference sessions agenda and create your own personal schedule with reminders, view details on sessions, code labs, office hours, and speakers, track announcements, and even view the keynote and live streamed sessions throughout the conference!
If you’re attending in person, you can use it to guide yourself around the venue using the vector-based conference map, Android Beam session details, scan fellow attendee badges, and provide feedback on the sessions you watch.
And stay tuned after I/O when every Google I/O technical session will also be posted to GDL and YouTube, and the conference app will be open sourced.
I think I’m having a Gene Amdahl moment http goo gl 7v4kf
By Andy Rubin, VP of Engineering
Recently, there’s been a lot of misinformation in the press about Android and Google’s role in supporting the ecosystem. I’m writing in the spirit of transparency and in an attempt to set the record straight. The Android community has grown tremendously since the launch of the first Android device in October 2008, but throughout we’ve remained committed to fostering the development of an open platform for the mobile industry and beyond.
We don’t believe in a “one size fits all” solution. The Android platform has already spurred the development of hundreds of different types of devices – many of which were not originally contemplated when the platform was first created. What amazes me is that even though the quantity and breadth of Android products being built has grown tremendously, it’s clear that quality and consistency continue to be top priorities. Miraculously, we are seeing the platform take on new use cases, features and form factors as it’s being introduced in new categories and regions while still remaining consistent and compatible for third party applications.
As always, device makers are free to modify Android to customize any range of features for Android devices. This enables device makers to support the unique and differentiating functionality of their products. If someone wishes to market a device as Android-compatible or include Google applications on the device, we do require the device to conform with some basic compatibility requirements. (After all, it would not be realistic to expect Google applications – or any applications for that matter – to operate flawlessly across incompatible devices). Our “anti-fragmentation” program has been in place since Android 1.0 and remains a priority for us to provide a great user experience for consumers and a consistent platform for developers. In fact, all of the founding members of the Open Handset Alliance agreed not to fragment Android when we first announced it in 2007. Our approach remains unchanged: there are no lock-downs or restrictions against customizing UIs. There are not, and never have been, any efforts to standardize the platform on any single chipset architecture.
Finally, we continue to be an open source platform and will continue releasing source code when it is ready. As I write this the Android team is still hard at work to bring all the new Honeycomb features to phones. As soon as this work is completed, we’ll publish the code. This temporary delay does not represent a change in strategy. We remain firmly committed to providing Android as an open source platform across many device types.
The volume and variety of Android devices in the market continues to exceed even our most optimistic expectations. We will continue to work toward an open and healthy ecosystem because we truly believe this is best for the industry and best for consumers.
Wednesday, June 25, 2014
On screen Input Methods
Starting from Android 1.5, the Android platform offers an Input Method
Framework (IMF) that lets you create on-screen input methods such as software
keyboards. This article provide an overview of what Android input method editors
(IMEs) are and what an application needs to do to work well with them. The IMF
is designed to support new classes of Android devices, such as those without
hardware keyboards, so it is important that your application works well with the
IMF and offers a great experience for users.
What is an input method?
The Android IMF is designed to support a variety of IMEs, including soft
keyboard, hand-writing recognizers, and hard keyboard translators. Our focus,
however, will be on soft keyboards, since this is the kind of input method that
is currently part of the platform.
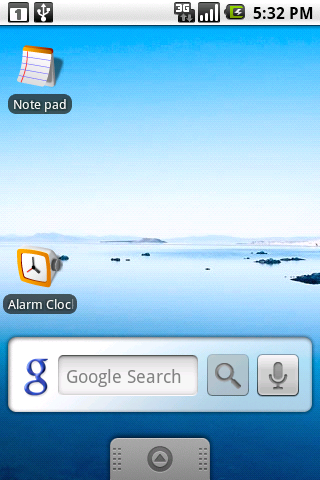
A user will usually access the current IME by tapping on a text view to
edit, as shown here in the home screen:
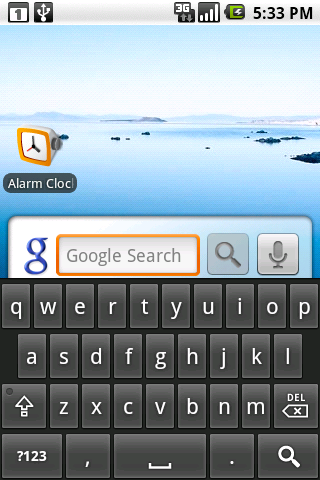
The soft keyboard is positioned at the bottom of the screen over the
applications window. To organize the available space between the application
and IME, we use a few approaches; the one shown here is called pan and
scan, and simply involves scrolling the application window around so that
the currently focused view is visible. This is the default mode, since it is the
safest for existing applications.
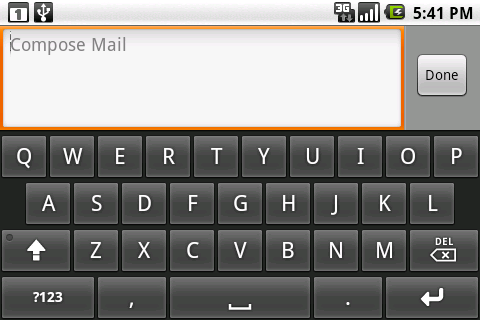
Most often the preferred screen layout is a resize, where the
applications window is resized to be entirely visible. An example is shown
here, when composing an e-mail message:

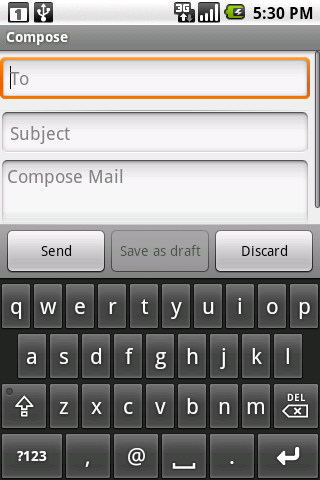
The size of the application window is changed so that none of it is hidden by
the IME, allowing full access to both the application and IME. This of course
only works for applications that have a resizeable area that can be reduced to
make enough space, but the vertical space in this mode is actually no less than
what is available in landscape orientation, so very often an application can
already accommodate it.
The final major mode is fullscreen or extract
mode. This is used when the IME is too large to reasonably share space
with the underlying application. With the standard IMEs, you will only
encounter this situation when the screen is in a landscape orientation,
although other IMEs are free to use it whenever they desire. In this
case the application window is left as-is, and the IME simply displays
fullscreen on top of it, as shown here:
Because the IME is covering the application, it has its own editing area,
which shows the text actually contained in the application. There are also some
limited opportunities the application has to customize parts of the IME (the
"done" button at the top and enter key label at the bottom) to improve the user
experience.
Basic XML attributes for controlling IMEs
There are a number of things the system does to try to help existing
applications work with IMEs as well as possible, such as:
- Use pan and scan mode by default, unless it can reasonably guess that
resize mode will work by the existence of lists, scroll views, etc. - Analyze the various existing TextView attributes to guess at the kind of
content (numbers, plain text, etc) to help the soft keyboard display an
appropriate key layout. - Assign a few default actions to the fullscreen IME, such as "next field"
and "done".
There are also some simple things you can do in your application that will
often greatly improve its user experience. Except where explicitly mentioned,
these will work in any Android platform version, even those previous to Android
1.5 (since they will simply ignore these new options).
Specifying each EditText controls input type
The most important thing for an application to do is to use the newandroid:inputType
attribute on each EditText. The attribute provides much richer
information
about the text content. This attribute actually replaces many existing
attributes (android:password,android:singleLine,android:numeric,android:phoneNumber,android:capitalize,android:autoText, and android:editable). If you specify the older attributes
and the new android:inputType attribute, the system usesandroid:inputType and ignores the others.
The android:inputType attribute has three pieces:
- The class is the overall interpretation of characters. The
currently supported classes aretext(plain text),number(decimal number),phone(phone number), anddatetime(a date or time). - The variation is a further refinement on the class. In the
attribute you will normally specify the class and variant together, with the
class as a prefix. For example,textEmailAddressis a text field
where the user will enter something that is an e-mail address (foo@bar.com) so
the key layout will have an @ character in easy access, andnumberSignedis a numeric field with a sign. If only the class is
specified, then you get the default/generic variant. - Additional flags can be specified that supply further refinement.
These flags are specific to a class. For example, some flags for thetextclass aretextCapSentences,textAutoCorrect, andtextMultiline.
As an example, here is the new EditText for the IM applications message text view:
    <EditText android:id="@+id/edtInput"
        android:layout_width="0dip"
        android:layout_height="wrap_content"
        android:layout_weight="1"
        android:inputType="textShortMessage|textAutoCorrect|textCapSentences|textMultiLine"
        android:imeOptions="actionSend|flagNoEnterAction"
        android:maxLines="4"
        android:maxLength="2000"
        android:hint="@string/compose_hint"/>
A full description of all of the input types can be found in the
documentation. It is important to make use of the correct input types that are
available, so that the soft keyboard can use the optimal keyboard layout for the
text the user will be entering.
Enabling resize mode and other window features
The second most important thing for your app to do is to specify the overall
behavior of your window in relation to the input method. The most visible aspect
of this is controlling resize vs. pan and scan mode, but there are other things
you can do as well to improve your user experience.
You will usually control this behavior through theandroid:windowSoftInputMode attribute on each<activity> definition in yourAndroidManifest.xml. Like the input type, there are a couple
different pieces of data that can be specified here by combining them
together:
- The window adjustment mode is specified with either
adjustResizeoradjustPan. It is highly recommended
that you always specify one or the other. - You can further control whether the IME will be shown automatically when
your activity is displayed and other situations where the user moves to it. The
system wont automatically show an IME by default, but in some cases it can be
convenient for the user if an application enables this behavior. You can request
this withstateVisible. There are also a number of other state
options for finer-grained control that you can find in the documentation.
A typical example of this field can be see in the edit contact activity,
which ensures it is resized and automatically displays the IME for the user:
    <activity name="EditContactActivity"
        android:windowSoftInputMode="stateVisible|adjustResize">
        ...
    </activity>
Note:Starting from Android 1.5 (API Level 3),
the platform offers a new method,
{@link android.view.Window#setSoftInputMode(int mode)},
that non-Activity windows can use to control their behavior. Calling this method
in your will make your application incompatible with previous versions of the
Android platform.
Controlling the action buttons
The final customization we will look at is the "action" buttons in the IME.
There are currently two types of actions:
- The enter key on a soft keyboard is typically bound to an action when not
operating on a mult-line edit text. For example, on the G1 pressing the hard
enter key will typically move to the next field or the application will
intercept it to execute an action; with a soft keyboard, this overloading of the
enter key remains, since the enter button just sends an enter key event. - When in fullscreen mode, an IME may also put an additional action button to
the right of the text being edited, giving the user quick access to a common
application operation.
These options are controlled with the android:imeOptions
attribute on TextView. The value you supply here can be any
combination of:
- One of the pre-defined action constants (
actionGo,actionSearch,actionSend,actionNext,actionDone). If none of these are specified, the system will infer
eitheractionNextoractionDonedepending on whether
there is a focusable field after this one; you can explicitly force no action
withactionNone. - The
flagNoEnterActionoption tells the IME that the action
should not be available on the enter key, even if the text itself is
not multi-line. This avoids having unrecoverable actions like (send) that can be
accidentally touched by the user while typing. - The
flagNoAccessoryActionremoves the action button from the
text area, leaving more room for text. - The
flagNoExtractUi
completely removes the text area, allowing the application to be seen behind
it.
The previous IM application message view also provides an example of an
interesting use of imeOptions, to specify the send action but not
let it be shown on the enter key:
android:imeOptions="actionSend|flagNoEnterAction"
APIs for controlling IMEs
For more advanced control over the IME, there are a variety of new APIs you
can use. Unless special care is taken (such as by using reflection), using these
APIs will cause your application to be incompatible with previous versions of
Android, and you should make sure you specifyandroid:minSdkVersion="3" in your manifest. For more information,
see the documentation for the
The primary API is the new android.view.inputmethod.InputMethodManager class, which you can retrieve with Context.getSystemService().
It allows you to interact with the global input method state, such as
explicitly hiding or showing the current IMEs input area.
There are also new window flags controlling input method interaction, which you can control through the existing Window.addFlags() method and new Window.setSoftInputMode() method. The PopupWindow
class has grown corresponding methods to control these options on its
window. One thing in particular to be aware of is the new WindowManager.LayoutParams.FLAG_ALT_FOCUSABLE_IM constant, which is used to control whether a window is on top of or behind the current IME.
Most of the interaction between an active IME and application is done through the android.view.inputmethod.InputConnection
class. This is the API an application implement, which an IME calls to
perform the appropriate edit operations on the application. You wont
normally need to worry about this, since TextView provides its own implementation for itself.
There are also a handful of new View APIs, the most important of these being onCreateInputConnection() which creates a new InputConnection for an IME (and fills in an android.view.inputmethod.EditorInfo
structure with your input type, IME options, and other data); again,
most developers wont need to worry about this, since TextView takes
care of it for you.
This is the droid youre looking for
Following last weeks announcement of the Open Handset Alliance, today were happy to offer an early look at the Android SDK. Were eager to get feedback from lots of developers in our discussion group. Were also providing developer documentation and this blog to help you get up and going.
Youre probably wondering about whats available today. This preview of the SDK will allow you to develop Android applications that you can run, test, profile, and debug using the emulator and the other included tools. Note that the look and feel of the user interface in the emulator is a placeholder for a final version that is under development.
One of our goals in releasing the Android SDK is to unleash the creativity of application developers on the platform. Wed also like to get feedback early enough that we can make changes before the first Android-powered devices are available to the public. We plan to release updates to the SDK regularly which means that there will be additions and changes to the APIs and user experience — subscribe to this blog to stay up to date.
Were really looking forward to seeing all the amazing applications that developers will create on an open mobile phone platform. In fact, you may even want to enter your application into the Android Developer Challenge — a USD$10 million challenge sponsored by Google to support and recognize developers who build great applications for the Android platform.
Subscribe to:
Posts (Atom)
